
First things first, let me be clear about the scope of this post. This is not an exhaustive tutorial about the Angular Framework. In fact this the exact opposite - a beginner's guide to get his first Angular app up and running at the shortest possible time and learn something in the process of doing so. When I say Angular, I refer to the Angular versions 2 and above and not the first version (AngularJS). So without any further ado, let's get started.
A bit of History
Angular is a web application framework developed by Google. The first version is called AngularJS and all successive versions from version 2 are simply called Angular. Angular is a complete rewrite of AngularJS although it has some of the features of the latter. At the time of writing this post, the latest version of Angular is Version 7.0.
For more details about different versions, see Angular Versions.
What do you need?
NodeJS - Angular uses NodeJS for a few things like downloading and installing libraries and packages using node packet manager. You can download and install Node from the below link.
Download Node
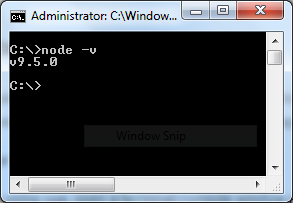
Node Package Manager is included in the above installation of Node. After successful installation, you can check the version of node installed in your computer using the following command in the command prompt.
node -v
Angular Command Line Interface (CLI) - Next you must install Angular CLI which is a tool that helps in creating Angular application projects, generating code, building and deploying angular applications. You can install Angular CLI using the node package manager directly from command terminal using the following command.
npm install -g @angular/cli
Note: The -g in the above command makes the installation global and not local to any particular directory in your computer.
After successful installation, you can use the below command to check the Angular CLI version installed in your computer.
ng -v

Text Editor - Now you can use any standard text editor to write code like Notepad++ but I highly recommend that you use Microsoft Visual Studio Code that has some cool features like syntax highlighting, intellisense support etc. that makes life a lot easier.
Visual Studio Code is available for free. You can download it here.
StarMan - Our First Angular App!
Now that everything is set up perfectly. Let's go ahead and create a new app using the below Angular CLI command.
ng new star-man

Note: star-man in the above command is the name of the application. You can call it what ever you want. Also, navigate to the path in which you want to have your application files using the command prompt before executing the above command. In my case, I'm creating it under the C: drive.
Wait for the Angular CLI to do the hard work of creating all necessary folder structure and files for you and once it is done you can navigate to the application directory and you can see the below folder structure.

Don't worry about the multitude of files and folders that are there in the application directory. For now focus on the src folder and the app folder inside it.
Now without modifying anything let's build and serve our application in our local server. First navigate to the app folder in the command prompt using the below command.
cd star-man

Note: star-man in the above code is my project folder path relative to my C: drive. You should navigate to the correct application path in your computer.
Now that you are inside the app folder. Run the below command to build your app if it has not already been done so and serve it in your local server.
ng serve

Once the Angular CLI finishes building your app, you will get the message - webpack: Compiled successfully. Once you get that, you can navigate to the url - http://localhost:4200/ from a web browser. You will see something similar to below.

Now let's make some changes to our app. Without closing the Angular CLI command window, open the app folder in VS Code or any text editor of your choice. In VS Code you can do File -> Open Folder -> Browse and Select your app folder.
Under the app folder of the src folder you will find the below files.
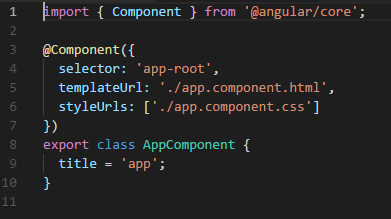
app.component.ts - This is the file where we write our TypeScript code.
app.component.html - This is the file that has the template or UI of this particular component. It is a plain HTML document.
app.component.css - This file has the css style code of this particular component. It is a CSS stylesheet.
The CSS file and the HTML file are connected to the TS file using the templateUrl and styleUrl properties of the Component decorator.
Now let's open and make some changes to the app.component.html file. Let's only have a heading - 'Welcome to the StarMan app!' and a StarMan image (URL - https://i.imgur.com/8lmrsZo.jpg). After the code changes, your app.component.html page should now look like below.

Now when you make changes and save, if the Angular CLI command window is open, your app will automatically be compiled and served under http://localhost:4200/ and it will look something like below.

Congratulations! You have successfully built your first Angular app. You can go ahead and make some changes of your own and see how it changes the overall look and feel of your app.
That's it for today guys. If you are stuck somewhere let me know by the comments section below. I will be happy to help.
No comments:
Post a Comment